Showing posts with label tutorials. Show all posts

September 18, 2012

Tutorial: DIY Fry Box, a step by step guide

Do you LOVE our printables, and think the fry boxes are OH SO CUTE but you don't know how to put them together? Then this post is for you! Our fry boxes are super easy to put together, and to show you, I've put together this step by step tutorial. 

Step One: Print out your Fry Box

step 1 - print
We have a lot of different options for fry box printables, and we add new designs all the time, so be sure to check out all the different themes, because you never know which one will work best for your party! (We are BIG FANS of mixing and matching the printables!)

Step 2: Cut!

step 2 - cut
step 2a -cut
Cut around the outside of edges of the fry box… this is the trickiest part of the whole process.

Step 3: Do a cheesy pose for the camera and wonder why your face is so red

step 3 - pose for the camera

Step 4: Score the curved lines

step 4 - score on lines
What is scoring, you ask? Scoring is when you create a line on the paper to make it easier to fold. YOU ARE NOT CUTTING. You’re making an indent on the paper, to reduce the stiffness along the line, to make it easier to fold the paper. There are scoring tools available, but they are not necessary, and to prove my point, you can see in the photo above that I am using the edge of a butter knife. Take that, fancy scoring tools.

Step 5: Bend the paper on the scored lines

step 5 - bend on scored lines
See how easy it is to bend that curved line now? If you didn’t score the paper, it would get all wrinkly and not be as crisp.

Step 6: Fold the straight lines

step 6 - fold straight lines
You CAN score the straight lines, but you don’t have to. It’s totally 100% your call.

Step 7: Apply glue to flaps

step 7 - apply glue on flaps
step 7a - apply glue on both flaps
On your fry box, you now need to glue the side flaps together, but you need to not have glue on the inside or outside of the box. So you apply your glue to the PRINTED SIDE of the flap.

Step 8: Press the sides together

step 8 - fold

Step 9: Voila! You have a Fry Box!

step 9 - ta-da!
And that’s it! So easy, so cute, and a fun addition to any celebration.
Now, get your fry box on. Winking smile

July 11, 2012

Beanbag Sock Octupus Tutorial

If you woke up this morning thinking, "Man, I really want to make a beanbag shaped like an octopus, but all I have is this lousy pair of socks," then BOY HOWDY, do I have a project for you!


It's a beanbag sock octopus made out of real socks and real beans.  For reals.  And it's not even that hard to make.  Here  I'll show you:


(And I'll tell you the steps that go with each picture, because that would be super handy, wouldn't it?)


1- Get a pair of socks (they can be new or old, however they CANNOT be stinky). You'll also need some beans, a needle and thread, scissors, and a couple of buttons.


2- Cut your socks so that you have the leg parts of both and one toe.


3- Now cut the leg parts into fourths - you need eight legs so cut each sock leg in half the long way and the short way.


4-  Turn each leg piece inside out and sew down the long side and across the bottom.  Leave the top open.  Do this for each leg.


5- Put some beans in the toe part you have cut - this is going to be the head.  Fill it to your desired head size (I kind of overfilled mine so it would stretch to a little bit bigger size).  Then sew the bottom of the head closed by taking stitches all the way around the opening and pull them tight.


6- Now fill a leg with beans.


7- Sew the bean filled leg onto the bottom of your head.  Make sure it's on there really really really  secure-like.


8- Repeat steps 6 & 7 for all of the legs.  This is what the bottom should look like.


9- If your leg stitches are secure you should be able to hold your octopus by the head and jiggle it with the legs hanging comfortably and not precariously.


10- Take a little scrap of left over sock and sew it around the very bottom where all the legs are sewn on.  This way you won't have any rough sock edges showing.


11- Sew on a couple of button eyes. (Also make sure these are really secure too - because beanbag sock octopuses must be played with roughly and you don't want those things to fall off.)


12- You're all done!  And see, it totally wasn't hard at all.  And now you have just what you wanted - a beanbag in the shape of an octopus made out of a pair of socks!


Now you can play games, or use it as a mini exercise weight, or let your kids throw it at each other, or squeeze it when you're stressed out, or maybe you could just use it to keep your papers from flying all over when the ceiling fan is turned on.  Beanbag sock octopuses (octopusi?) are really good for lots of things.

June 25, 2012

Chore Wheel Tutorial

My kids and chores are akin to gazelles and lions.  Because lions attack gazelles and eat them for breakfast.  except that my kids aren't the lions.  My kids are the gazelles, and the chores are what's eating them for breakfast, lunch, and dinner.

It's frustrating for all involved.  (Mostly for me.)  So I did something about it.


I got all super organized on them and have a list of daily chores for each child, plus chore wheels for rotating tasks, plus I have listed the rules (which includes mostly stuff like "no whining"), and to top it all off I have a chart to fill in with stickers so that for every 3 days of doing the chores and following the rules they get a prize.  

Right now our prizes are Squinkies.  Because toyrus.com has them on super mega sale, and you can get a two pack for $.50 if you buy 10.

For anyone who's confused on how to make a rotating chore wheel, here is how I made mine:

First I created the wheel pieces.  I was going to make a printable to go with this, but it really all depends on how many kids you want on the wheel and which chores and too many other variables to make a printable.  This is the wheel for my two older kids so I have a wheel for loading and unloading dishes, and then a smaller wheel with bigger chores.  Plus the biggest wheel for the top.


Then I covered the fronts of my wheel pieces with clear contact paper, because I knew they would be touched by little fingers every day and I want them to last the whole summer.


I also put a small piece of  clear contact paper on the insides of my cutouts on the top wheel.  Just for stability and fancy-ness.


Then I put a brad through the middle of all the wheel pieces.  The biggest wheel with the cutouts on top, then the smallest wheel, and the load/unload wheel on the very back.  When you're creating the pieces for your wheel you're going to want the other wheels to show through the cutouts once they're hooked together.  I did this digitally, but you could also cut out plain wheels, and then trace the cutouts onto all the pieces and just make sure you write the chore in the traced shape.


Lastly, I hung my wheels, and daily chores, and rules/prizes somewhere my kids will see it every day.  I chose to stick them on the creepy little cabinet I have at the top of my stairs.  It's kind of gross.  When we first moved in this cabinet made me almost vomit.  We keep cans in it now.

And now my kids better start being the lions, because I'm ready for the chores to be devoured already.

June 13, 2012

Tutorial: Make a Cute Mini Notebook


I am a cheapskate and do not pay for school yearbooks.  My kids are in elementary school - yearbooks are just a stupid idea.

But on the last day of school I knew that kids would be passing those books around and wanting "signatures" (as if first graders have signatures- they scribble their name and are lucky to remember all the letters) and I didn't want my kids to feel left out.  So I made them these cute mini notebooks for their friends to sign and scribble in.

They were super easy to make.  See:


1- Gather your supplies.  You'll need some cutesy paper, some regular paper, some adhesive, some staples, a paper slicer, and some chipboard (or a stiff something or other).

2- Slice the regular papers (inside papers) in half the long way.  Then fold them in half.  You can make your notebook thicker or thinner depending on how many papers you use.  But don't get too many, because this is a mini notebook, and thicker notebooks need different steps (I know these things).

3-Cut your chipboard to be a smidgeon-ish longer than the inside papers so it will hang over when it's all put together.

4- Fold the chipboard in half.

5- Take some decorative or plain colored paper and cut it so that it will fit on the ridge of your book, then fold it in half so you can just glue it on later.

6- Tuck your folded regular papers into your chipboard cover.  Make sure they're centered and stuff.  Then whip our your stapler.

7- I put staples in through the front and the back of the book because I knew kids would be handling these and I didn't want things to fall apart.

8- Using adhesive, glue that piece you cut out in step 5 to cover the staples.

9- Decorate the front however you'd like.  Make it pretty.

And that's it.  I got two done in only one episode of Buffy the Vampire Slayer, because they are just that quick to make (and I probably could have finished them more quickly, except that Buffy is sort of distracting, what with all that vampire slayage and stuff).


April 2, 2012

Craft Stick Puzzles: Printable and Tutorial

Craft stick puzzles are one of my new favorite things.  My kids love them, and they're cheap to make, and they don't get destroyed like paper pieces.

If you haven't made craft stick puzzles before, let me tell you how tremendously easy it is.

First, download this printable (because they're cute and sized right and just all around better than other craft stick puzzles):


Print the pages on cardstock and cut around the whole puzzle (don't cut each piece out yet).

This next step is optional, but I highly recommend it.  Cover the fronts (only) in clear contact paper.  This will help your puzzles last longer, especially since you know they're going to be handled by grubby little kid fingers.

Then chop the pieces apart with a paper slicey-cutter-thingy. (There are lines on the puzzles, so you know where to chop.)


Get a bunch of big craft sticks out, and rubber cement a piece to each one.  Try to center the pieces on the craft sticks just so they look better.  If a person was smart they would put one puzzle on one side of the stick and then a different puzzle on the other side of the stick.  Therefore needing half the amount of sticks.  A not so smart person, such as myself, just uses a whole bunch of single sided sticks.


Your sticks will need to dry before you can play, but rubber cement doesn't take long to dry.


To play with the puzzles, just hand your child the finished group of sticks.  You can make it easy by separating each puzzle to do one at a time, or the whole pile so your kid has to pick the right pieces before assembling.


We really really like craft stick puzzles.  (Isn't that the cutest little monkey you have ever seen?  And I'm not talking about the cartoon one, although it's kind of cute too.)

March 28, 2012

How to Customize Printables: your step by step guide to personalizing printables for your next event

personalize your printables

The most frequently asked question in our inbox is about whether or not we will customize our printables for you.  It’s because you have a special occasion that you’re celebrating, and you want  a certain initial, or number on a set of our freebies.

Unfortunately, we can’t accommodate every request, and getting a custom look on your own can seem pretty daunting…. especially if you’ve never done it before.

Today, I’m going to show you, step-by-step, how to customize the free printables on our site for your personal use. I’m going to show you a simple way to personalize your next shin-dig using my favorite digital scrapbooking software, My Memories Suite. 

Step One: Download the Printable

For the purposes of this tutorial, I’m going to use our Lego Party Printable Pack.  When you click on the download button or link, an automatic download should begin. Choose where you want to store that file, and save it to your computer.

Step Two: Open the Printable

Most of the printables that you would want to customize are saved in a .PDF file. This means that you will need Adobe Reader to open the file. Adobe Reader is a free software, and you can download that here.

When you have opened the file, find the page that you want to customize.

find the page you want to customize

Step Three: Select the page, and copy the image

highlight the page and COPY

The page should now be copied to your clipboard.

Step Four: Open My Memories Suite

Since our printables are sized to fit 8.5x11 standard letter paper, that is the size album you’ll need to make. I highly suggest making a new album, so you’re going to select “Design Your Own”.

design your own album

Step Five: Choose the album SIZE and ORIENTATION, then hit OK

select album size

Now we’re ready to get customizing!

The My Memories Suite software will be open with a blank page.

Step Six: Right click anywhere on the page to paste the copied image

blank canvas

copy the image into the album

Since the image and the album are the same size, the copied image will fit perfectly, and we are now ready to add our finishing touches.

Step Seven: Add a text box

add text box

The right sidebar is your control panel. This is where you get to have a lot of fun.

Step Eight: Type in a name

type a name

Step Nine: Change the font

My Memories will load any font you have installed on your computer, and most dingbats too, so you just have to use the drop down menu on the right and make your choice.
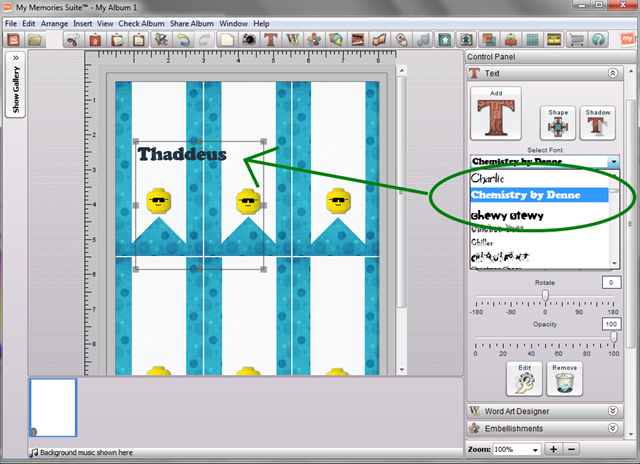
choose the font

Step Ten: Resize the font to fit

choose the font size

Step Eleven: Change the font color

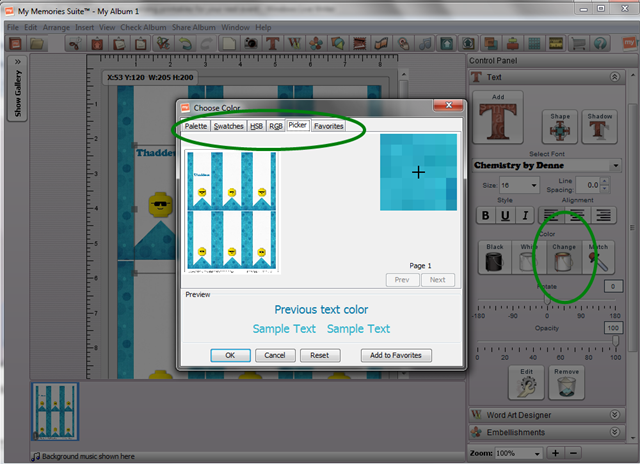
change the color

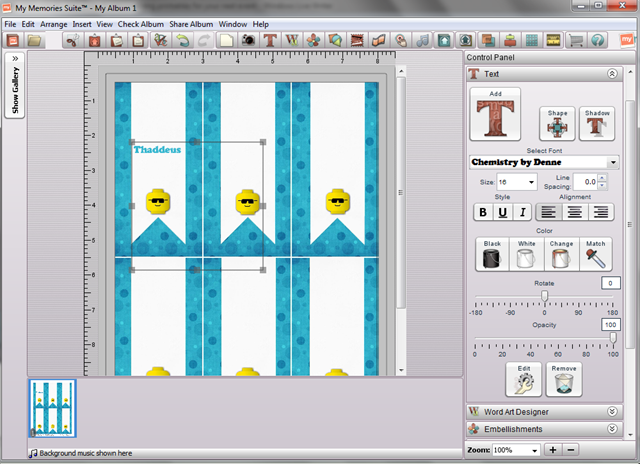
font is ready

You can see in the screenshots above that I can pick a color directly from the image, using the My Memories Suite color match tool. It’s very handy, and you don’t have to worry about the color being off! It’s always a perfect match.

Now, I plan to fold these labels and use them as place cards. This means I need to:

Step Twelve: ROTATE and MOVE text

All I have to do, is move the rotating slide bar in my text panel until the letters are upside down.
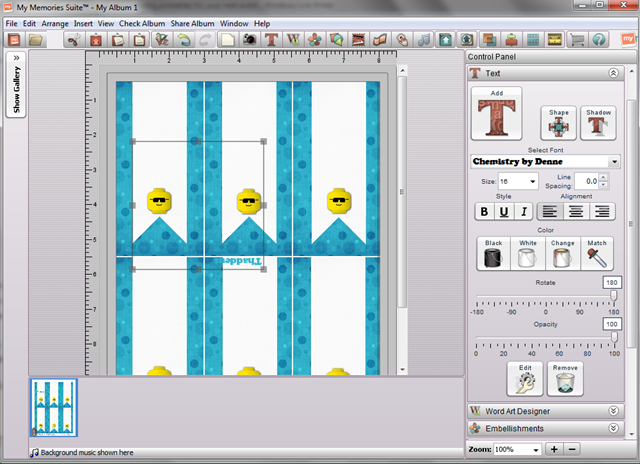
rotate the text

Then I’m going to move the text box where I want it.
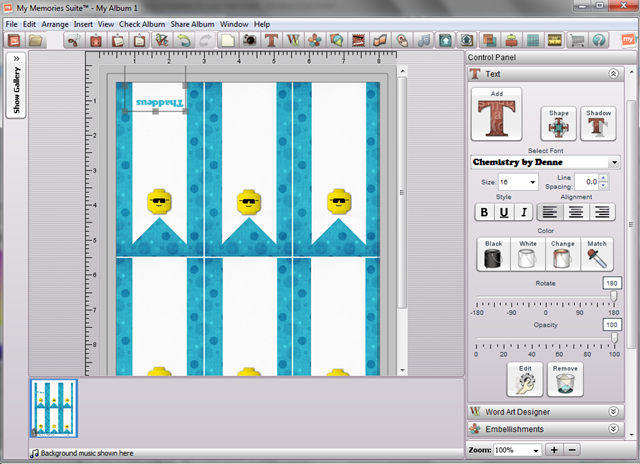
move the text

Step Thirteen: Copy and paste the text on each label

copy and paste the text

Step Fourteen: Edit the names

I’m going to enter the correct names on each label, and re-position them slightly so that they are centered on the label.

edit the text

Step Fifteen: Print!

print

If you don’t want to print them at home, you have the option of exporting the album in a .jpeg or .png format and sending them to your local print shop!

divider gray zig zag

Can you tell that we love My Memories Suite?

Use code: STMMMS32407 to get $10 off your software purchase AND to receive a $10 coupon in your software good towards anything in the My Memories store. 

divider gray zig zag

My Memories Workshop - Salt Lake City, UT

Join the My Memories team this Saturday in Salt Lake City, Utah for a hands on workshop. Learn how to create your own digital designs from the pros themselves! Tickets available here: My Memories SLC.

February 23, 2012

Tips & Tricks for Fantastic-Looking Printables: Sizing Help

tips and tricks graphic


QUESTION: I downloaded the printable, but it is WAY too big! What am I doing wrong? Help! 


ANSWER: You are doing nothing wrong, we are doing nothing wrong, and the printable isn’t doing anything wrong either. To answer this question, we actually are going to cover a couple of things. Firstly:

What is DPI?

DPI stands for Dots Per Inch and it’s a measurement of resolution. It is especially important in printing, because DPI directly affects the quality and clarity of the picture. More DPI (or pixels) equals more detailed prints. Have you ever tried to enlarge a photo, only to have it come out blurry? That happens when the original picture was at a low resolution.

resolution sample

All of our printables are saved at 300DPI for optimal printing.

Next: Because our printables are saved at 300DPI, when you open it on your computer, the file looks HUGE! This is totally fine, it’s supposed to look that way! In just a minute, I’ll explain how to work with that.

Sometimes, our printables can be downloaded as 8.5x11 digital PDF’s. We try to do this to make your life easier, because you literally just hit the print button. If you can’t open the PDF file, you probably need to get Adobe Reader, which is a free program that you can download here. Once the file is open and you are viewing the PDF, select which pages you want to print, and then only print what you need.

Prior to any printing, we suggest double checking to make sure your printer is calibrated!

On to non-PDF downloads: Many times, our printables are available as jpeg and png files. When there is only a single item in the download, or when the size requirement is larger than standard letter sized paper, we will offer the image file for download.

So, how do I get the printable the right size?

First, find the image you want to print. For the purposes of this post, I’m going to use our St. Patrick’s Day subway art.

locate the image

Next, select the image, and open it using your preferred photo viewer.

select the image

Your screen will now look something like this:

image open in photo viewer

And now we want to look at the print options, so in the navigation bar, we are going to use the Print drop down menu.

select print for options

Once you select PRINT, you will be taken to a new screen where you will set your print options. This is where you can change the size of the print, and choose how many copies you want

make it right

  1. Make sure you’re sending your images to the right printer!
  2. Set the resolution to 300DPI for the sharpest images
  3. Decide on the size! If you are doing an 8x10, choose that size. If you want to make the image smaller, now is the time to do it. Once you have decided the size,
  4. Select the amount of copies you want to print. And I always fit the picture to frame, so that the proportions will remain the same as the original image.
  5. Hit Print!

If you still are unsure about how to print, or if you want to save your ink, there is always the option to send your items to your local print shop. Don’t have a local print shop? Then we recommend printing via Persnickety Prints…. because they’re persnickety… about their prints… and they ship. 

Now… look through our printables, find one you love, and get printing. Winking smile