Showing posts with label kid crafts. Show all posts

February 8, 2013

Valentine Magnet Pairs


This kind of magnet is so easy to make - just print and cut out the circles, use rubber cement to attach them to the backside of craft pebble jewel thingy, and hot glue on a magnet.  I hardly doubt it could be easier.

And you'll love these magnets because they come in cutesy Valentine pairs and your kids can play matching games on your fridge, or you can give each pair away as a special lovey dovey gift.

just click the image to download this free printable.

My favorite is the penguin.  Probably because I just know lots of cool people.

January 4, 2013

things of Pinterest: snowflakes


It's winter.  That's pretty much all that's going on now that the holidays are over.  And so, blech, winter.  But snow can be fun, I guess if you try really hard.  Personally, I think snow is evil, but that's no reason not to do some snow-y crafts - ideas thanks to the awesome that is Pinterest.

http://deliacreates.blogspot.com/2011/01/snowman-pizza-and-dough-recipe.html
We've already tried a snowman pizza like this.  I even took pictures, but then my dough went into super rise mode and it ended up being a very blobby/fluffy/crazy snowman, so you won't be seeing those pictures.  The kids really liked eating it though, so that's what counts.


http://anthonyherreradesigns.com/index.php?option=com_content&view=article&id=56%3Astar-wars-snowflakes&catid=34%3Aanthonydesign-blog
We're Star Wars geeks here, so these snowflake templates pretty much ROCK HARD.  They're just awesome.  And awesome.  But I'm thinking they'll take some practice since precise cutting isn't exactly in my skill set.


http://deliacreates.blogspot.com/2011/01/snow-and-ice-activities-for-kids-part_11.html
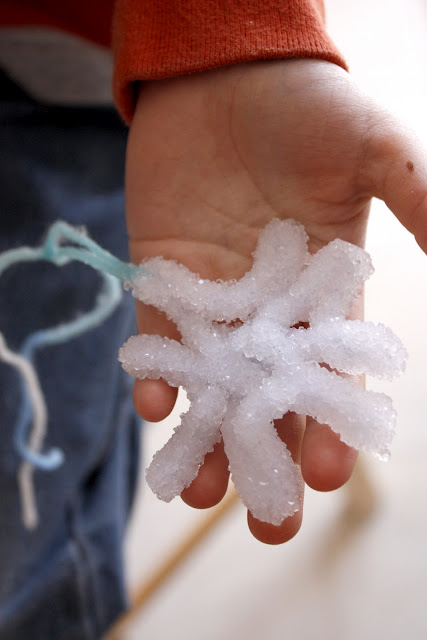
I've been wanting to make crystals with my kids for awhile now, how much more fun is a snowflake crystal going to be to make?  These are made out of pipe cleaners and Borax, and only need to be left overnight to grow.  So basically, win, win, win.

And that's how I am going to cope with winter and snow.  What about you?


December 21, 2012

Christmas Craft Stick Puzzles Printable

So school's out for the holidays, and I still need my kids to stay busily out of my hair while I finish up some last minute Christmas presents.  So I'm hoping to entertain them with some new Christmas craft stick puzzles.....at least they'll be busy for about 2.7 minutes.


Just click the image to download these free craft stick puzzle printables, or you can click here.

If you're not sure how craft stick puzzles work, you can check out the tutorial we posted here.


August 15, 2012

Kids Craft: Painting with Marbles


We like messy activities at our house, and painting with marbles is one of our ultimate favorites.  Plus it has really cool results, and you can even display it without it looking like a 3 year old made it (even though they did).

First of all you need supplies:
• paper, cardboard, posterboard, or whatever surface you want to paint on
• a box, or cookie sheet, or in our case a big dry erase board covered in plastic wrap (because it's going to get messy)
• finger paint, acrylic paint, or whatever kind of paint you want to use (I think acrylic works best)
• marbles (of course) but you can also do paintings with hotwheel cars, or plastic dinosaur feet, or lots of other creative things.

So, put your paper (or whatever) on your white erase board (or whatever you're using).  And then squish some paint onto it.  At first I started with really huge glops which actually made the marbles get stuck easily, so I would suggest using smaller and more dispersed paint glops.


Then grab a bunch of marbles and start rolling them around in the paint.  If you're using a box you can tilt the box to get the marbles to roll.  We tried doing that with our setup, but it was easier (and more fun) just to roll the marbles back and forth to each other.


My methods are, of course, the messiest possible way to do a marble painting (aside from using your feet, I guess).  But it's also really great for sensory processing and fine motor control, and my boys loved it.


And this is why I covered my white board with plastic wrap.  Also, we painted our kitchen floor a little bit too, but it washed off.


I tried a bunch of different paints and surfaces, and here are the results.  This first one is a paper bag with finger paint:


This is acrylic paint on tracing paper:


This is a regular sheet of paper with acrylic paint:


And this is some bubble wrap with glitter glue - NOT RECOMMENDED.  Because, obviously, it's ugly.  And also, glitter glue?  What was I thinking?  (Plus it's more fun just to pop the bubble wrap.)


My favorite was when we used acrylic paint on blue posterboard.  We're totally displaying it to the world (or anyone who walks down our stairs).  Jackson Pollock, eat your heart out.


July 11, 2012

Beanbag Sock Octupus Tutorial

If you woke up this morning thinking, "Man, I really want to make a beanbag shaped like an octopus, but all I have is this lousy pair of socks," then BOY HOWDY, do I have a project for you!


It's a beanbag sock octopus made out of real socks and real beans.  For reals.  And it's not even that hard to make.  Here  I'll show you:


(And I'll tell you the steps that go with each picture, because that would be super handy, wouldn't it?)


1- Get a pair of socks (they can be new or old, however they CANNOT be stinky). You'll also need some beans, a needle and thread, scissors, and a couple of buttons.


2- Cut your socks so that you have the leg parts of both and one toe.


3- Now cut the leg parts into fourths - you need eight legs so cut each sock leg in half the long way and the short way.


4-  Turn each leg piece inside out and sew down the long side and across the bottom.  Leave the top open.  Do this for each leg.


5- Put some beans in the toe part you have cut - this is going to be the head.  Fill it to your desired head size (I kind of overfilled mine so it would stretch to a little bit bigger size).  Then sew the bottom of the head closed by taking stitches all the way around the opening and pull them tight.


6- Now fill a leg with beans.


7- Sew the bean filled leg onto the bottom of your head.  Make sure it's on there really really really  secure-like.


8- Repeat steps 6 & 7 for all of the legs.  This is what the bottom should look like.


9- If your leg stitches are secure you should be able to hold your octopus by the head and jiggle it with the legs hanging comfortably and not precariously.


10- Take a little scrap of left over sock and sew it around the very bottom where all the legs are sewn on.  This way you won't have any rough sock edges showing.


11- Sew on a couple of button eyes. (Also make sure these are really secure too - because beanbag sock octopuses must be played with roughly and you don't want those things to fall off.)


12- You're all done!  And see, it totally wasn't hard at all.  And now you have just what you wanted - a beanbag in the shape of an octopus made out of a pair of socks!


Now you can play games, or use it as a mini exercise weight, or let your kids throw it at each other, or squeeze it when you're stressed out, or maybe you could just use it to keep your papers from flying all over when the ceiling fan is turned on.  Beanbag sock octopuses (octopusi?) are really good for lots of things.

June 27, 2012

Free Printable Magnetic Bookmarks

Motivating my kids to keep up their reading in the summer usually has to include bribes, because days are sunny and pools are calling.  So while I was perusing for bribes I came across these super adorable magnetic bookmarks on Disney's Family Fun site.

Aren't they the cutest?!  You can download them for free at family.go.com, and then when you're done with that, you can get our magnetic owl bookmarks for free too!  

Because if you have multiple kids, you're going to need multiple options, and everyone is going to need at least two.


Happy summer reading!  (I'm thinking about laminating these so that we can read in the pool......oh, but then I'd have to laminate our book pages too....my plan may possibly be flawed.)

June 13, 2012

Tutorial: Make a Cute Mini Notebook


I am a cheapskate and do not pay for school yearbooks.  My kids are in elementary school - yearbooks are just a stupid idea.

But on the last day of school I knew that kids would be passing those books around and wanting "signatures" (as if first graders have signatures- they scribble their name and are lucky to remember all the letters) and I didn't want my kids to feel left out.  So I made them these cute mini notebooks for their friends to sign and scribble in.

They were super easy to make.  See:


1- Gather your supplies.  You'll need some cutesy paper, some regular paper, some adhesive, some staples, a paper slicer, and some chipboard (or a stiff something or other).

2- Slice the regular papers (inside papers) in half the long way.  Then fold them in half.  You can make your notebook thicker or thinner depending on how many papers you use.  But don't get too many, because this is a mini notebook, and thicker notebooks need different steps (I know these things).

3-Cut your chipboard to be a smidgeon-ish longer than the inside papers so it will hang over when it's all put together.

4- Fold the chipboard in half.

5- Take some decorative or plain colored paper and cut it so that it will fit on the ridge of your book, then fold it in half so you can just glue it on later.

6- Tuck your folded regular papers into your chipboard cover.  Make sure they're centered and stuff.  Then whip our your stapler.

7- I put staples in through the front and the back of the book because I knew kids would be handling these and I didn't want things to fall apart.

8- Using adhesive, glue that piece you cut out in step 5 to cover the staples.

9- Decorate the front however you'd like.  Make it pretty.

And that's it.  I got two done in only one episode of Buffy the Vampire Slayer, because they are just that quick to make (and I probably could have finished them more quickly, except that Buffy is sort of distracting, what with all that vampire slayage and stuff).


April 2, 2012

Craft Stick Puzzles: Printable and Tutorial

Craft stick puzzles are one of my new favorite things.  My kids love them, and they're cheap to make, and they don't get destroyed like paper pieces.

If you haven't made craft stick puzzles before, let me tell you how tremendously easy it is.

First, download this printable (because they're cute and sized right and just all around better than other craft stick puzzles):


Print the pages on cardstock and cut around the whole puzzle (don't cut each piece out yet).

This next step is optional, but I highly recommend it.  Cover the fronts (only) in clear contact paper.  This will help your puzzles last longer, especially since you know they're going to be handled by grubby little kid fingers.

Then chop the pieces apart with a paper slicey-cutter-thingy. (There are lines on the puzzles, so you know where to chop.)


Get a bunch of big craft sticks out, and rubber cement a piece to each one.  Try to center the pieces on the craft sticks just so they look better.  If a person was smart they would put one puzzle on one side of the stick and then a different puzzle on the other side of the stick.  Therefore needing half the amount of sticks.  A not so smart person, such as myself, just uses a whole bunch of single sided sticks.


Your sticks will need to dry before you can play, but rubber cement doesn't take long to dry.


To play with the puzzles, just hand your child the finished group of sticks.  You can make it easy by separating each puzzle to do one at a time, or the whole pile so your kid has to pick the right pieces before assembling.


We really really like craft stick puzzles.  (Isn't that the cutest little monkey you have ever seen?  And I'm not talking about the cartoon one, although it's kind of cute too.)

March 12, 2012

free paperdolls printable

One time my mom drew some paper dolls that looked just like my sisters and me. And they were awesome. I'm not willing to draw custom paper dolls for everyone though. Because that is just crazy talk. But you can get these free paper dolls to print and play with and make fun memories with your kids.

click to download

Print these on cardstock and laminate them to last longer.  Or you can cut off all the tags and mount the pieces on magnetic strips to get the clothes to stay on easier.  The magnets also allow you to play with the dolls in fun places like the fridge.

I plan on posting more clothing to print with these every once in awhile.  But let me ask you a questions - do you want a boy version?  Do boys like to play with paper dolls?


divider gray zig zag 
REMINDER: Printables from Peonies and Poppyseeds are free for non-commercial, personal printed use only. Mass production and file sharing are not permitted. If your friends or family want to know where you got your printables, send them to our site. Thanks!

February 9, 2012

Quick and Easy: DIY Banner Tutorial

Banner’s are all the rage right now, and I don’t know about you, but the weather where I’m at has been a little too gloomy for my taste. So I decided to make a quick and easy, spring-ish, could also pass as Valentine’s-ish banner…. IT’S WHAT MAKES ME HAPPY, ALRIGHT?

To start, you need to gather your supplies. I went with a greenish/pink cottage type vibe, because a) I had it and b) I like it. And those are the two most important components to this sort of afternoon craft.

diy banner 1
Next, I cut the papers into 5x7 rectangles.

diy banner 2
And this is not related to the task, but the day was rather gloomy and dreary, and the lighting was oh so terrible. I tried to fix it, but no go. I’m just letting you know, so as to explain why the pictures are slightly different shades of colors.

NEXT STEP: Trimming the ends. I cut out a point, also known as a triangle.  Now some people would throw the triangle pieces away, but oh no, not I.  TRIANGLES FOREVER! 

diy banner 3
Now, you should have two stacks of papers. A cute banner shape stack, and a triangle shape stack.
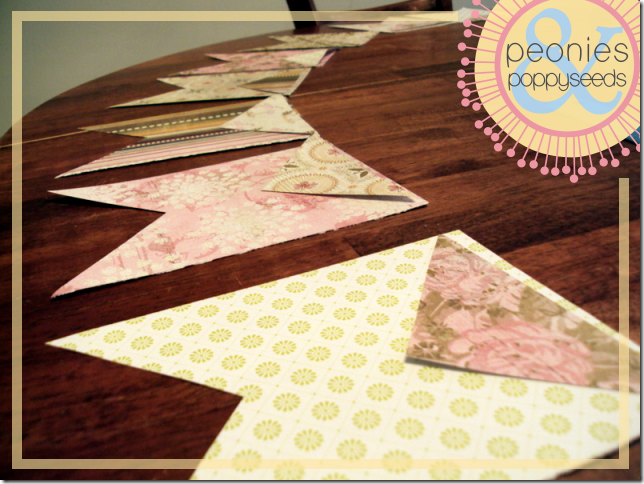
CRITICAL STEP! Lay out the banner pieces in an order that is pleasing to thine eye. If you used all the same types of paper, awesome. If you mixed and matched from your scrap pile, awesome. Lay it out, move it around, play with the order until you like it.

Then, you mix and match the triangle pieces over the tops of those… like so:
diy banner 4
Now you’ll notice that I didn’t put the triangle pieces all the way to the top. For this banner, I chose to score, then fold, and staple the banner. If you want to put the pieces all the way at the top, you can. It’s you banner, so it’s your call.

But for the sake of argument, I’ll show you my score line. It’s a little less than a half an inch from the top, not that I measured. I eyeballed it.

diy banner 5
I also couldn’t find my scoring tool, so I used a flat head screwdriver instead. If it works, it works. You could also use the back of a butter knife, if you can’t find your screwdriver, not that I’ve ever had to do THAT before *cough*.

diy banner 6
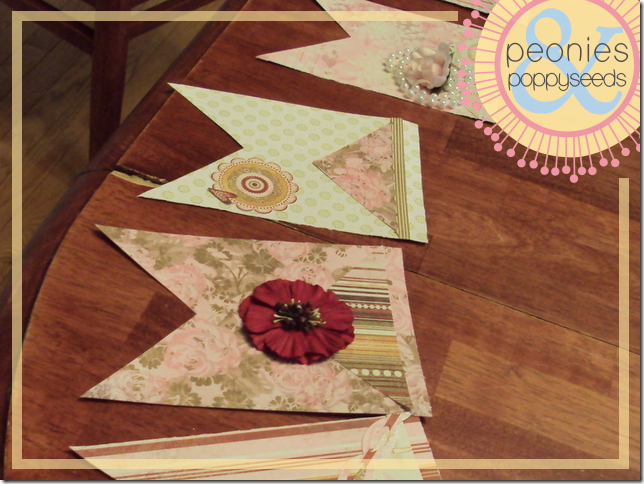
ANYWAYS. After you have finished scoring all your banners, then you can start to assemble them to your liking. Glue down the triangles, add some embellishments… whatever you have, that you like.
diy banner 7
Once that’s all done, you’re ready to attach the banner flags. I had grosgrain ribbon on hand, so that is what I used. (Can you sense a theme here?)

diy banner 8
I just slipped the ribbon under the flag, and then folded the scored edge over. Then I stapled each end, and once more in the middle just for good measure.

diy banner 9
I spaced each flag about three fingers apart, and got my assembly line on.

When everything was attached, I used some extra ribbon to tie a knot between each flag for some pizazz. (Plus, I really like ribbon.)

diy banner 11
The nice thing about this banner is that it’s LIGHT, so I grabbed my scotch tape, and hung it on up.

Instant cheer on this cold, winter day.

diy banner 10

Total cost for this project: $0, but that’s only because I had everything on hand. And my four year old totally go in on the action and helped glue and assemble everything. Perfect way to brighten up any rainy day.

January 16, 2012

Hand Warmer Craft Tutorial

I woke up to snow this morning which, let me tell you, was not a happy thing.  Stupid snow.  But here's a craft I did with my kids to help combat the cold.


We gave away a few of these as gifts, which was great because they were cheap and easy, and I seriously made my kids do half of the work.  Here is how to make your own:

First you need to make a pattern (we did hearts and stars).  Basic shapes are easiest - just take a piece of paper, fold it in half, draw half a shape, cut it out and unfold.  (Look, one of my patterns was made out of a paper towel, because we're super fancy here.)


Then take a piece of fabric (we used polar fleece, but I've made these with other fabric) and cut out a pair of whatever your shape is.

Next, you need to sew around your shape, leaving a small opening.  And make sure you sew with the right sides facing each other.


And then, turn your shape right side out.  This is where your kids come in handy.


Then, make your kids fill the warmer with rice.  I handed my kids a funnel, a grody bowl to catch the stray rice and then told them to work together.  It semi-worked, but in the end, they got it filled.


Once the handwarmer is filled with rice, you'll need to turn the edges of the opening in and pin it shut.


Then you make your kids sew the opening shut with a needle and thread.  Because it teaches them new skills and makes them practice fine motor control and also because if they do it then you won't have to (even though first graders clearly aren't the best seamstresses).


Then, if you want to give these as a gift, you'll need to print out the little hand warmer printable just


...and then print and cut.

Lastly, all you have to do is stick the handwarmer and the printed card in a bag and viola - cheap and easy gift that your kids did most of the work.  Or you can just use one at home to combat the evil cold of snow.


_________________________________________________________

Want to know when we post new tutorials?
Get Peonies and Poppyseeds newest posts by email or in your blog reader.

Follow us on: Twitter, Become a Facebook Fan and keep-up via Networked Blogs!