Showing posts with label kid snack. Show all posts

February 2, 2016

Black Bean and Corn Salad


Black bean and corn salad is my family's favorite meal, EVER.

I always have all the ingredients on hand, and my kids love to help chop and mix everything together. Then they proceed to eat it by the spoonful.

The great thing about this concoction is that it can be a stand-alone dish, or you can use it to top a salad. We also have used it in lettuce wraps, we've wrapped it in a flour tortilla and fried it like a chimi, and, of course, we can always use it to dip tasty chips int.

Basically, there is no wrong way to eat this stuff. It's like heaven in your mouth.

YUM.


Black Bean and Corn Salad

  • 1 can black beans, rinsed and drained
  • 1 cup corn
  • 1 cup spinach, chopped (optional)
  • 2 roasted red peppers (or 1 fresh) chopped 
  • 1/4 cilantro, chopped
  • 1/4 green onion, chopped
  • 3 cloves garlic, minced
  • juice from 2 limes, plus 1 tsp zest
  • salt and pepper to taste
Mix all ingredients in bowl. Chill for extra flavor. Enjoy.

August 3, 2012

Creepy Crawly Cookie Fail

Have you seen the cookies that some people have made that look like fossils?  They're super cute, and the concept seemed pretty easy, so I wanted to make some of our own.

Except that I was also feeling very lazy.

So I went to the grocery store and bought some premade, preformed sugar cookie dough.  And then I rounded up all of our creepy crawly plastic toys (bugs, frogs, dinosaurs, whatever) and washed them.


Then, seeing as I was feeling very VERY lazy, I put ALL the cookies on one cookie sheet.  Because baking two pans of cookies was just too much effort.  (quit judging, I spent my extra time letting my kids bury me in stuffed animals while I napped, so it was total quality time.)


Then I let my little monkey help me squish our plastic creepy crawly toys into the tops of the cookies.  And yes, he has a tattoo on his face.  And his arm.  We were feeling patriotic.


Things were looking SUPER FABULOUS.  Because I thought, "This is so easy!" and also "I'm tired, I think I'll take a nap".


So we baked the cookies.  Would you like to see our awesome end results?  Here you go:

TOTAL FAILURE!

So here are some tips so that you can get it right:
1- Don't be lazy.
2- Make your own dough, something that won't rise and expand so much.
3- Use really small toys to make the impressions (I thought ours were small enough, but it would have been better to get a whole spider impression then just a part, you know?)
4- Don't be lazy.

Miraculously I saved myself from cookie humiliation by making the most delicious cream cheese frosting I've ever made in my life, and we ate the cookies anyway.


March 2, 2012

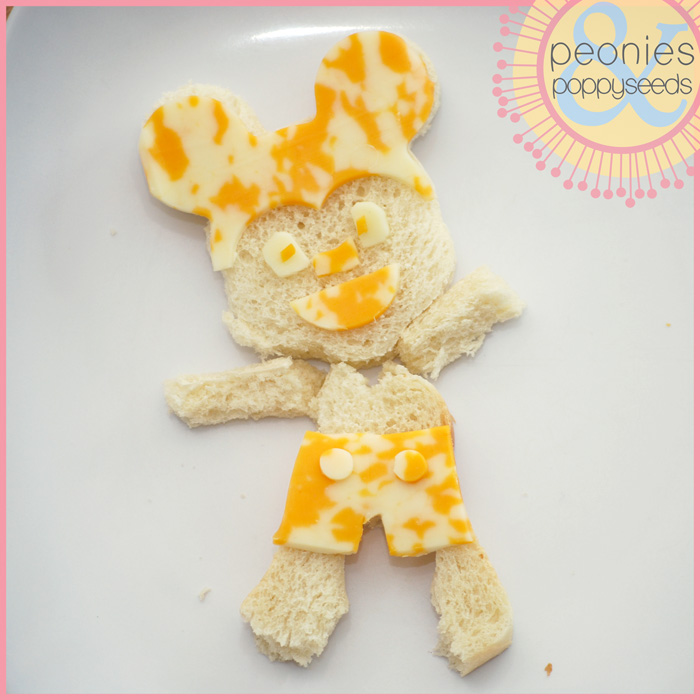
Minnie and Mickey Kid Snack


Cheese and bread - two absolutely guaranteed foods that my kids will eat.  (Even the picky ones.)  But sometimes it's fun to make the cheese and bread a little less boring, so one day I made Disney style Mickey and Minnie Mouse.  (Which received much applause and praise from my 3 and 4 year old.)


They're made entirely out of 2 pieces of bread and a few slices of cheese.  I have minnie and mickey head cookie cutters, so that part was super easy - although their heads are just one big circle with two little ear circles, so it's not like it's horrifically difficult to cut freehand, right?

The bread for the rest of their bodies was made out of the scraps after I cut the heads out.


You can cut and place the cheese however you'd like.  I decided on a skirt and shorts for them, but even if you just made the ear/head part out of cheese your kid is going to know what it is and be excited.

And have I mentioned that these are ONLY BREAD AND CHEESE?  Seriously, easiest fun lunch ever.

November 19, 2011

Gum Drop Turkey Snacks


Every Thanksgiving, as I was growing up, we made gumdrop turkeys.  And then we ate them.  So now I have the same tradition with my kids. 

Want to make your own gumdrop turkey with your own kids?

Sure you do!  And here's how:

First gather supplies (and children):


You will need: big gumdrops, little gumdrops, toothpicks and those orange slice gummy thingies (the orange slices are actually optional, but they do make the best "feet").

Now take a couple of toothpicks and stab one side into the orange slice thingy and the other side into the bottom of a big gumdrop.


Then take the little gumdrops and stick a toothpick in each one, and then stick them into the back of the big gumdrop to make a tail.  


Note: you can have as big of turkey tail as you want, but I must warn you that the bigger your tail is, the more likely your gumdrop turkey is to fall over once you're done - it's just a sad fact in gumdrop turkeydom).

Now, break a toothpick off so it's a little bit shorter than normal, but make sure you get all the wooden shards off of it so that you don't have to eat them later.  And then stick a small gumdrop on one end and stick the other end in your big gumdrop to be a head.

And then take a little orange gumdrop and pinch off a little chunk and stick it to the head for a beak.  Then take a little red gumdrop and pinch off an even smaller sliver and stick that to the beak for that red hangy thingy that turkeys have that I have no idea what it's really called.


That's it!  And hopefully it doesn't fall over too much (you can reposition the legs if your turkey doesn't stand very well).  

And your turkey will taste super yum when you eat it.  Unless you use white spice gumdrops, because whatever that flavor is, it's NASTY.


______________________________________________
Want to know when we post new kids crafts?
Get Peonies and Poppyseeds newest posts by email or in your blog reader.
Follow us on: Bloglovin’, Twitter, Become a Facebook Fan and keep-up via Networked Blogs!

October 3, 2011

Cheesey Mummies Snack


These snacks are great because you can get creative with the toppings (as in, you don't have all the things you thought you needed so you must improvise with things like frozen peas for eyeballs).

To make the Mummy Pizza:

Smear pizza sauce (or if you're lazy, like me, a premade jar of spaghetti sauce) on english muffin halves.

Use olives, scallions, pepperonis, or WHATEVER for eyeballs.

Pull apart some string cheese and drape the pieces over the english muffins so they look like wraps.  You can even have your wraps go over some of your eyeballs, just for kicks and giggles.  (I used the cheese sparingly because I sent this to a class of 20 kids, so yeah, you can use more cheese if you want.)

Heat up the mummies on a cookie sheet in a hot oven (350ยบ ish) for about 10 minutes, or until the cheese is melted and the muffins are warm.

I found the idea for the mummy pizza here.


The mummy fingers are easy: 

Just take some string cheese and cut little slices in it for the "knuckles".  You should eat the little pieces of cheese that you end up slicing out.  Because string cheese tastes good.

"Glue" half of an olive on for the fingernail by using a dab of cream cheese.  You could use green olives or peppers for the nails if you want (I don't think mummified fingernails have to be a specific color).

I found the mummy finger idea here.

Chill the fingers until you're ready to eat them.  You can also serve the mummy pizza's cold as long as they stay refrigerated, but they probably taste best warm.


* * * * * * * *

Get Peonies and Poppyseeds newest posts in email or in your blog reader. 

Follow us on: Twitter, Become a Facebook Fan and keep-up via Networked Blogs!